Installing Oracle Applications Release 12 On Windows 2003
Preface: There are many changes in the installation process of Release 12 compared to 11i. I will illustrate here in detail its installation on Windows 2003 environment.
Step I: Partitioning and OS Installation
Pre-requisites:
As before a Good Computer :-) oops…not just a good computer.. A Very Good Computer :-) The recommended (Minimum) pre-requisites are:
Hardware
Processor : Pentium 4
Memory : 4 GB RAM
HDD : 250 GB or higher
Optical Drive : CD/DVD-ROM (For copying installation files from CDS/DVDS)
Software
OS: Windows 2003
Release maintenance tools: (a) VC2005 (b) MKS Toolkit or Cygwin (c) Dotnet
We can install VC98 also for testing purposes as the system will not stop if VC98 is available, but absence of VC98 or VC2005 will result in installation error.
MKT Toolkit or Cygwin is mandatory, without which installation will result in error.
Dotnet is also mandatory, though I didn’t find mention of it in the installation manuals. The same can be downloaded from the Microsoft website.
http://www.microsoft.com/downloads/details.aspx?FamilyID=0856eacb-4362-4b0d-8edd-aab15c5e04f5&displaylang=en
Once we have all the above, make the following partitions at the time of installing the OS:
C:\ >: 20GB (For installing Windows 2003)
D:\ >: 180GB or more (For installing Oracle Applications)
F :\>: 50GB (For Staging Area/Installation Files)
Note: Drive letters are optional except for C:\.
Step II: Creating Staging Area for Apps 12 Installation
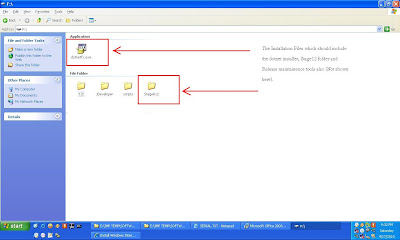
Create a folder named Stage12 in F:\ Drive and copy the installation files in it.

Step III: Install Other Required Softwares
Install other required software like VC98/VC2005, MKS Toolkit or CYGWIN and Dotnet. The installations of these programs are like any normal windows program installation and I assume, you have the knowledge to do so.
Step IV : Install Applications
For installing the applications, go to the drive where you have copied the installation files and go to the following folder (Example only as the drive on your system may differ.):
F:\ Stage12\startCD\Disk1\rapidwiz
Double click rapidwiz.cmd icon to launch Rapid Installer.


+Environment.JPG)



.JPG)




Preface: There are many changes in the installation process of Release 12 compared to 11i. I will illustrate here in detail its installation on Windows 2003 environment.
Step I: Partitioning and OS Installation
Pre-requisites:
As before a Good Computer :-) oops…not just a good computer.. A Very Good Computer :-) The recommended (Minimum) pre-requisites are:
Hardware
Processor : Pentium 4
Memory : 4 GB RAM
HDD : 250 GB or higher
Optical Drive : CD/DVD-ROM (For copying installation files from CDS/DVDS)
Software
OS: Windows 2003
Release maintenance tools: (a) VC2005 (b) MKS Toolkit or Cygwin (c) Dotnet
We can install VC98 also for testing purposes as the system will not stop if VC98 is available, but absence of VC98 or VC2005 will result in installation error.
MKT Toolkit or Cygwin is mandatory, without which installation will result in error.
Dotnet is also mandatory, though I didn’t find mention of it in the installation manuals. The same can be downloaded from the Microsoft website.
http://www.microsoft.com/downloads/details.aspx?FamilyID=0856eacb-4362-4b0d-8edd-aab15c5e04f5&displaylang=en
Once we have all the above, make the following partitions at the time of installing the OS:
C:\ >: 20GB (For installing Windows 2003)
D:\ >: 180GB or more (For installing Oracle Applications)
F :\>: 50GB (For Staging Area/Installation Files)
Note: Drive letters are optional except for C:\.
- Install Windows 2003 on drive C.
- Once the OS is installed, right-click on My Computer and Select Properties.
- Select the tab Computer Name and Click button Change…
- Give the name of the computer (For Example anything, if it’s not already given during the installation and click Button More…
- Give the primary DNS suffix for the computer (For Example everything.com and Click Button OK (3 times to save the changes)
- Create ‘Oracle’ User Account and make it a member of ‘Administrators’ groups
- Restart the computer.
Step II: Creating Staging Area for Apps 12 Installation
Create a folder named Stage12 in F:\ Drive and copy the installation files in it.
- The top level directory i.e., Stage12

- The sub-folders in the main Stage12 directory.

Step III: Install Other Required Softwares
Install other required software like VC98/VC2005, MKS Toolkit or CYGWIN and Dotnet. The installations of these programs are like any normal windows program installation and I assume, you have the knowledge to do so.
Step IV : Install Applications
For installing the applications, go to the drive where you have copied the installation files and go to the following folder (Example only as the drive on your system may differ.):
F:\ Stage12\startCD\Disk1\rapidwiz
Double click rapidwiz.cmd icon to launch Rapid Installer.

- Click Next after review the details.

- The option to install or upgrade has to be selected. Also we have the option to use ‘Use Express Install’ for vision instance wherein the most commonly used Oracle Apps modules are installed with default settings.

- If you have Oracle Support credentials you can enter the same as these are useful for Oracle Configuration Management and for support from Oracle. For testing purposes, you can leave these fields blank.

- By default the option ‘Create a new configuration’ is selected for new installations. When a installation is restarted then the second option i.e., ‘Load the following saved configuration’ will be selected by default. As we are going to do a new installation, we can click on Next button while the default option is selected.

- For new installations, most of the settings are default and just need to click Next.

- The default ports are selected by default.

- Select the Database type as Vision Demo Database as we are installing this for testing purposes and we will get a pre-configured application database for the imaginary organization ‘Vision Corporation’. This is very helpful while designing similar solutions. Also select the host name, OS, installation directory etc.
+Environment.JPG)
- Give the path of Release maintenance tools, Host, Domain, Base directory etc and click on Next.

- Click on Next as most of the settings are default for installation on a single PC. These options will be useful when the applications and database are on two or more different servers.

- The system will perform a pre-installation test whether all the prerequisites exists or not.

- The rapidwiz installer will check the prerequisites like port availability, disk availability, release maintenance tools etc.

- Upon successful completion of test, the system will show the test results. If all the tests are passed, we can proceed with the installation by clicking on Next.

- Review the Component installation and click on Next.

- Before installation, the rapidwiz will alert about the installation as the installation will take 4-5 hours or more.
- Installation in progress!


- Rapidwiz is unzipping and installing the application files.

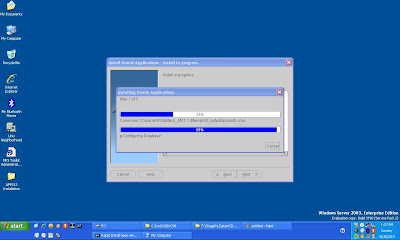
- Once the unzip completes, the rapidwiz will install the database. At this point of time, if the Dotnet application is not installed previously, then the installation will fail. The system will populate a command window and automatically some commands are executed in this window as shown below:

- Installation goes into next phase.

- Stage 2 of installation completed.

- Installation progress in the Command window.

- Pure techie messages :-)
.JPG)
- Phase 4 of installation in progress.

- Installation successful :-) . The system gives a report for the same.
- Last step of installation. We can connect to application from this step by clicking on the button ‘Connect to Oracle Applications Release 12.1.1’ or click on finish to connect later.


- Upon connecting to the Applications URL, we are presented with the Microsoft Phishing Filter message. (This varies based on the browser settings). Select as per your security requirements.

- The login page is displayed. For vision instance, we can use the default username and passwords i.e., sysadmin/sysadmin.

- The default responsibilities for the username SYSADMIN are displayed.

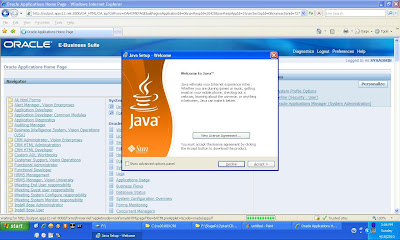
- Click on the desired responsibility and then on the function. Based on browser settings, a message will be displayed for installing the Sun Java Addin.

- Install the Java Addin. This is mandatory for accessing the Oracle Applications.

- Click on Accept button to install the addin.

- After installation click on any function again and a security warning message will come. Select Run to start Oracle Applications.

- Based on browser settings, the pop-up blocker will stop Oracle Applications from launching the applet. Set the pop-up blocker property as per your security requirements and also to allow Oracle Applications to launch the applet.

- Oracle Applications 12 Up And Running :-)


